Here is a guide on building a storage shed for anyone who would like to try to build their own. The materials I used were galvanized steel beams that I purchased from a man selling them on donedeal.ie the beams were around 16 feet long and 100kg in weight that were originally used on motorway crash barriers. H iron will also work but I got the steel beams as I felt they are very strong galvanized and offered good value for money at around 60 euro.
I had initially planed on building a smaller 4 pillar shed so when I changed my plan I just brought channel iron for the centre pillars from a local hardware store. I also picked up 3 lengths of 9×3 timber and 12 lengths of 6×3 timber. I purchased the cladding second hand locally and after that I just needed some nuts and bolts TeX screws cleats etc to bolt it all together.

Ground work
I firstly marked out the ground with some timber pegs and builders cord to make sure it was all squared up at 90 degrees. Next I dug 6 holes with a small digger that I had hired out for another job anyway but hiring a kango hammer might also do the job and while it might take more work you could have a tidier hole and use less concrete afterwards
The holes were dug 2 foot deep and at the top of the steel uprights I cut a 3″ square out for the 9×3 timber beams to sit into. You can’t have the shed whatever height you want but remember to add 2 feet that will be underground and I had a 2-foot drop between the front and back uprights at a distance of almost 20 feet between them.
With the help of a man on a digger I put each upright into place one at a time and filled the holes with thick concrete by thick I mean do not add much water and large stones or rocks can also be used to firm it up as the beams are quite heavy. If like me you have not got power where the shed is being built then you could either hire a generator or a petrol cement mixer which is what I used.
Once the uprights were in place I used a spirit level and my eye to get them as straight to upright as possible. I also had put a mark on the bottom of the uprights at two feet just to be sure they were all the same height and same depth under the ground. I also put the 9×3 timber beams on the top sitting into the slots I had cut out before the concrete dried just to be sure everything fitted in correctly.
After giving the concrete around the uprights a few days to dry out properly the 9×3 timbers were bolted to the top of the uprights and the 6×3 timbers were attached to the top of the 9x3s and held in place using long nails and cleats
Sheeting
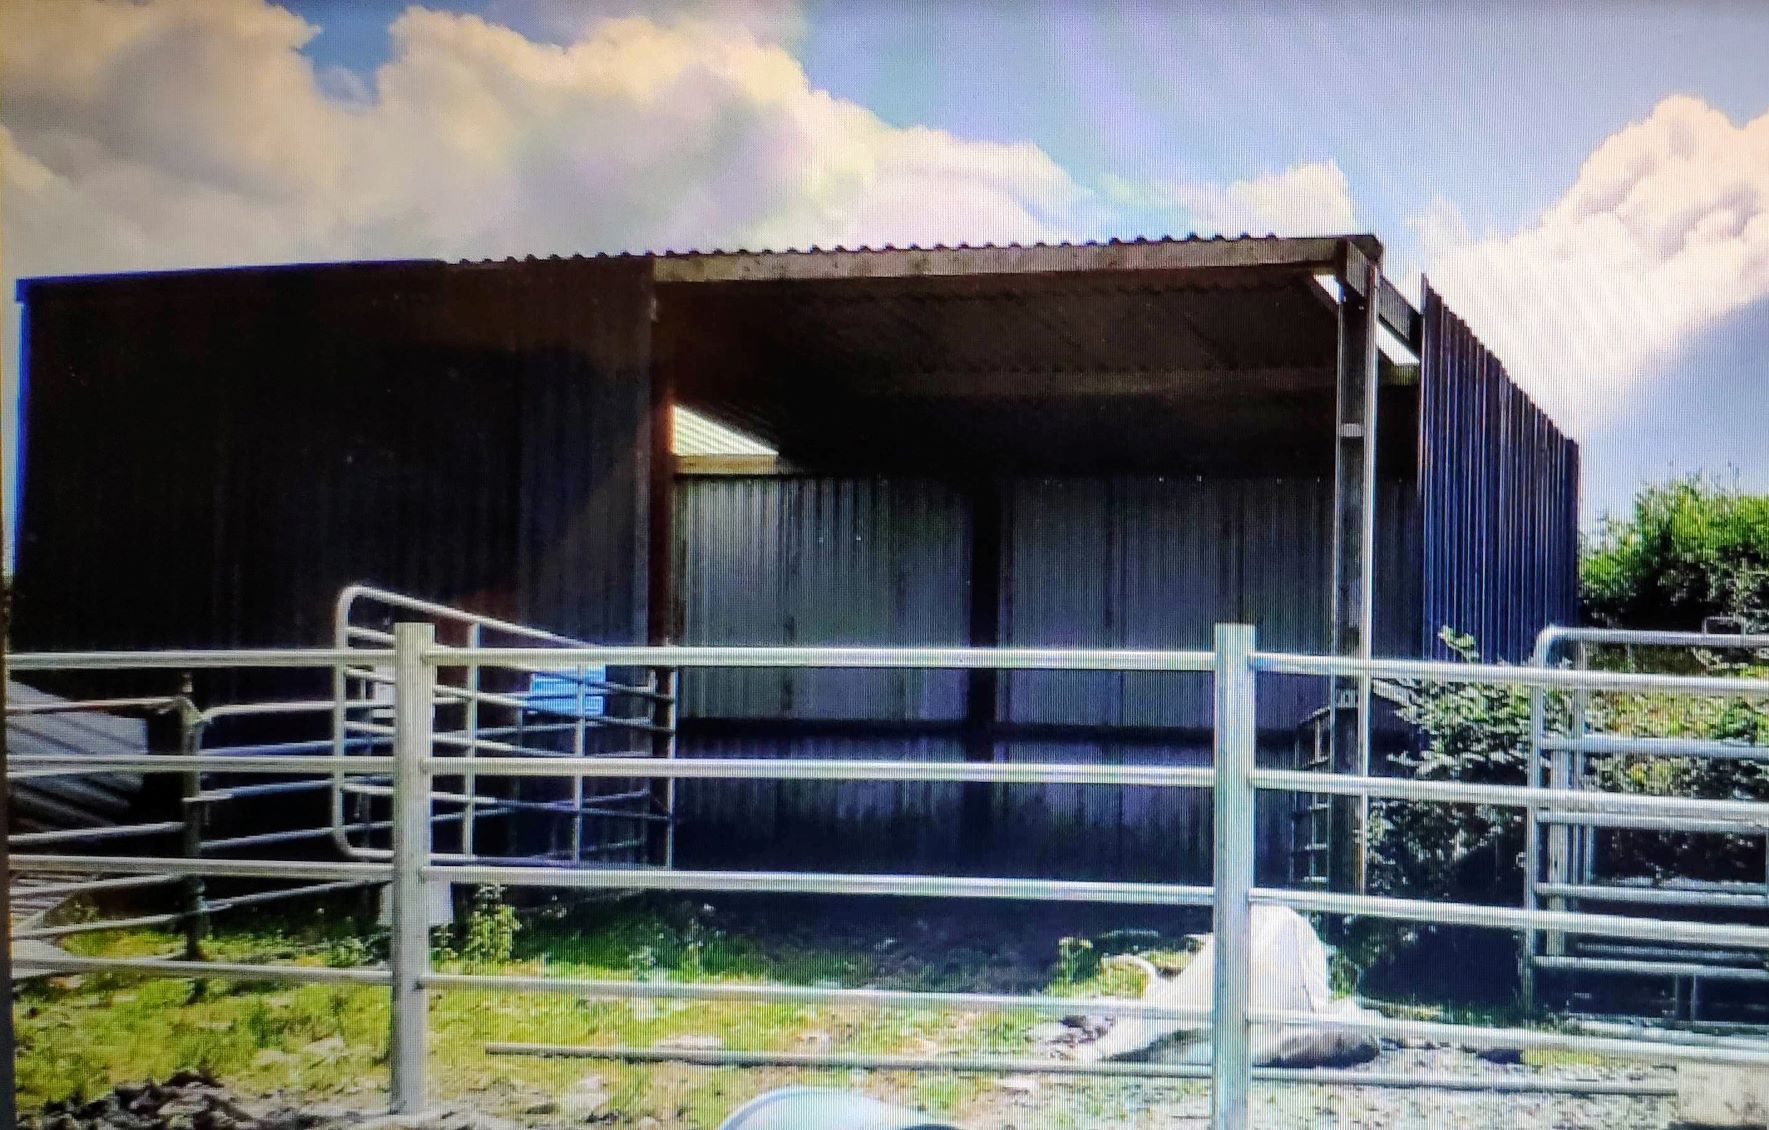
Finally more 6×3 timbers were put on to the uprights mid way leaving a space for the door. Then the cladding was attached to the timbers using long tex screws and a drill. I started with the roof and used a sheet of clear perspex cladding to allow more light in to the end away from the door.
Then the sides were covered then using a cordless grinder to cut off any excess cladding at the top. I used a cordless chainsaw to cut the timbers. The last step was to attach corner flashings between the roof and walls and attach a gate to the fount. A concrete floor poured would be a good idea too depending on what you plan on storing in it.

The result after less than a weeks work was a nice shed for storing hay, machinery or temporary holding of animals and the cost at the time was less than 2000 euros. I later added a holding pen and cattle crush to the outside. While there are plenty options and shed kits out there this is just a simple example of how I built my own.
5 thoughts on “Building a storage shed”
Hey, thanks a lot for sharing this article with us and all the recommendations you gave us.
I am building a house and I have been looking for such a product for a long time. My favorite is Concrete Mixer Concrete Power Portable & Easy to Load Capacity 140L. I think the great advantage is that it has a capacity of 140L which helps me add a lot of material. The price is very cheap, only $ 199.99 considering that I found on other sites very expensive prices. When it comes to purchasing such products always Amazon is the solution I choose.
Hello DJ,
You certainly did some excellent work building a shed for storage. You put in much skill and expertise to it.
The idea of using galvanized steel beams is excellent as this ensures durability, lower cost (compared to steel), lower maintenance cost, reliable performance, as well as adequate security due to resistance to mechanical damage.
Timber has become quite a bit expensive of late (with the eco-friendly movement everywhere from my location), so I’d like to ask if there could be a different alternative.
Boniface- AndroidBix.
Thanks I was happy with how it turned out for my first attempt as I wouldn’t have much construction experience. You could try pricing galvanized purlins instead of the 6×3 timbers depending on where you are. The timber in Ireland was not too expensive when I was doing this shed but a lot of timber is grown here.
Nice job building this! It looks massive too, and for less than 2K EUR; That’s really good. It looks like it’d be good for storing canned perishable goods too, not just animals and equipment. I might look into getting the materials and follow your lead and build this. Glad I came across this post.
thanks nate if you have any more questions on the build just ask.